How to Create Checklist in Microsoft Office Word

Are you packing for an outing and want to ensure that you have taken all necessary things? Do you have a list of tasks to be done before a due date? Not just this, there might come instances when you have to make sure that you do not leave anything important. It is always useful and easy to have a printed check list so that you can verify the job’s done. In this post we will show you how you can easily create a checklist in Microsoft Office Word that can be printed out.
If you need to create a checklist, periodically the same one, then it will be more useful if you have the checklist in Word office in order that you can regenerate it easily. So, here is the quick and easy procedure to create a checklist in Microsoft Office Word.
Creating a printable checklist in Word
What we will will do is first create a bulleted list with easy and familiar steps that we already know, but instead of bullets we will use a check box symbol before each list item. Here’s step by step guide with screenshots on how you can do it:
Step 1: Create a bulleted list
First, type the list of items or names that are to be checked, one by one. Make sure that every entity is in a different line. Use enter key to to separate items into different lines.

If an entity or a task exceeds a line, use the Increase indent option in the Paragraph group in the Home tab.

Now, select the list and hit the drop down arrow near the Bullets icon in the Paragraph section of the Home tab.

If a check box type bullet appears in the bullet library, hit on that and you will have a check list created. However, don’t worry if you don’t see such option in your bullet library. Below we will show you how you can define a new bullet type and get this symbol in your bullet library.

Step 2: Convert checklist bullet type
If you don’t see checklist symbol in your bullet library then click on ‘Define New Bullet’. This will popup a ‘Define New Bullet’ dialog box.

Click Symbol, and in the new dialog box that appears, select Wingding from the drop down list of the Font.

A plain check box symbol will be there and click on it and that’s it, you will have a checkbox symbol used for the list and the checklist will be ready.

You can print this Microsoft word checklist of yours and can manually check checklist by hand on paper whenever the task is done.

Creating a clickable checkbox in word
To create a check list in Word that is checked or unchecked when you click on it, you have to follow a little procedure that will be quite alien to you, but you’ll find it easy in no matter of time.
Hit the Developer Tab
First, switch to the Developer tab from the Home tab. The Developer tab is generally not displayed in the Access Bar or the Ribbon by default.

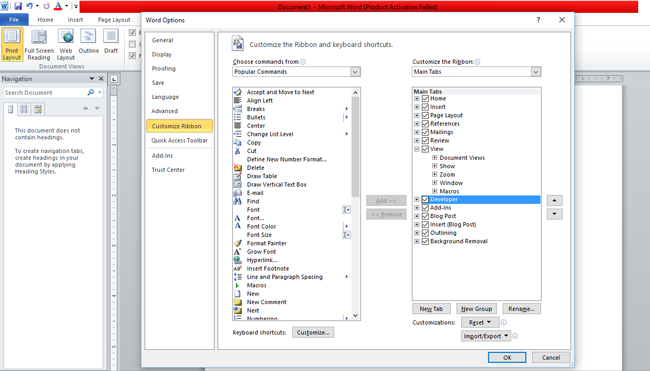
In order to view the Developer tab, right-click anywhere in the empty space in Ribbon. Select Customize Ribbon… from the list that appears.
Word Options dialog box will appear. In the left pane, select Popular that will be in the top of the list.
Now, enable the check box that says ‘Show Developer Tab in the Ribbon’ and then click OK.
Now, you will see that the Developer tab is added to the Ribbon.

Insert the Check Box Control
In the Developer tab, select the check box control from the Controls section. (In Microsoft Office 7, click on the Legacy Tools in the Controls section, and then select check box control from it)
Repeat the above step for the required number of times to create the check list.
Now, you have your clickable Microsoft word check list that will toggle between check and uncheck states when you click on it once.
Optional steps
If you need, you can group the check boxes using Group in the Controls section and can restrict the modifications to be done using Protect Document in the Protect section.
The check box is crossed when checked. You can also change the symbol by right-clicking on the check box and choose
Change for the Checked Symbol from the Checked Box Properties dialog box that appears.
In the Symbol dialog box, select a symbol of your choice and hit OK. Note that the symbol can’t be altered in Office 7.
That’s all, folks. All set to prepare your check list in word?
Before hurrying, please note that the clickable check list created in a version might not work in a lower version of Office.
Also note that, Microsoft OneNote has better support for tasks and clickable checklists and if you have it installed already, you may want to use it to track your tasks instead of Microsoft Word.
Tech Tip : Get an instant one click access to your Office 365 documents,emails and windows applications from anywhere, anytime on any device with high performance citrix xendesktop at an affordable citrix xendesktop pricing. You can also add complete MS office suite to the same xendesktop by visiting O365CloudExperts.com.